Advertisement


Technique Theory: Chocolate Panning
By Peter Greweling and Culinary Institute of America
Published 2013
- Work at Optimal Temperature/Humidity Levels. Chocolate panning requires specific environmental conditions, namely a room temperature of 13° to 16°C/55° to 60°F and relative humidity below 60 percent. Without these conditions, it is difficult to obtain good results. A room that is too warm allows excessive heat to build up in the pan, slowing the process, causing bare spots on the centers or preventing the chocolate from setting completely. A room that is too cold causes the chocolate to have a rough finish or to flake off during engrossing and causes an excessive number of doubles or clusters. Excessive humidity prevents polishes and glazes from developing and maintaining the proper shine and in extreme cases can lead to sugar bloom on chocolate. The temperature and humidity of the room must always be maintained within the proper parameters to achieve the desired results.
- Select the Proper Centers to Pan. Centers to be chocolate panned are most frequently either roasted nuts or dried fruits, although a range of solid centers may be used, including caramels, fondants, and jellies. The rounder and more uniform the center, the easier it is to obtain a smooth finished product; hazelnuts will result in a smooth finish with few doubles much more easily than dried cranberries will because the nuts are rounder and smoother to begin with. The most common cause of the formation of doubles or clusters during panning is centers that are not round. Peanut halves, dried cranberries, or whole coffee beans will always have a tendency to join together because they each have a flat side, which naturally conjoins with other centers. When panning dried fruit, the moisture content must be sufficiently low to prevent the fruit from softening during the panning process. While it is not impossible to pan non-round centers with irregular surfaces, it is more difficult than panning round, regular-surfaced ones.
- Use Centers at Panning-Room Temperature. Centers to be panned should be at the same temperature as the panning room. Cold centers causes flaking, formation of doubles, and a rough coat, just as an excessively cold room does. Warm centers cause bare spots and slow the engrossing process, much like a panning room that is too warm. Storing the centers in the panning room overnight before panning ensures that they are at the correct temperature for the process.
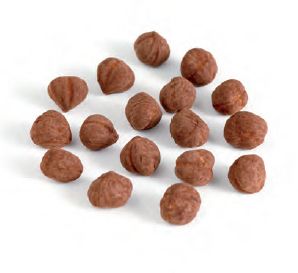
- Precoat the Centers. Load the centers into the pan, start rotation at 25 rpm, and apply a thin precoating of a gum or starch solution. Panning polish is often used for this step. Once the centers are moistened with the polish, apply a dusting of cocoa powder and/or confectioners’ sugar. The moist polish will affix the dry powder to the centers. The more irregular the centers are, the more heavily they should be precoated to fill in irregularities. Precoating reduces the incidence of fat migration from nuts (see Fat Migration), improves adhesion of the chocolate, and fills irregularities in the centers—thus reducing the time and amount of chocolate required to complete the process—resulting in a smoother finish.
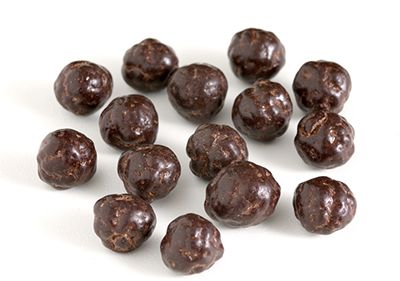
Engross the Centers. Engrossing is the process of rapidly building up layers of chocolate on the centers by adding many charges of chocolate to the centers as they cascade in the rotating pan. To engross the centers with chocolate, rotate the pan at about 25 rpm, and ladle untempered chocolate (at approximately 32° to 35°C/90° to 95°F) into the pan in small increments. The exact amount of chocolate to add depends on the size of the batch and the size of the individual centers being panned. As a rule, enough chocolate should be added with each charge to lightly cover all of the centers with a thin, fresh coat of chocolate. Adding too much chocolate in charges increases the incidence of doubles. Allow each new addition of chocolate to set on the centers before adding the next; this typically takes 3 to 5 minutes; setting is complete when the centers begin tumbling freely in the pan. During this time, cool air from the panning room should be blown into the pan to dissipate built-up heat and accelerate the crystallization of the chocolate.
Cold air creates a rough exterior (see step 1 of the technique). Doubles or multiples are caused by adding chocolate too quickly (see step 5 of the technique). Polishing unsmoothed centers creates a rough exterior (see step 6 of the technique). The total amount of chocolate used depends on the desired results and the variety of centers used. Chocolate-panned coffee beans may require 4 or 5 parts chocolate to 1 part beans, while nuts may use as little as 1 part chocolate to 1 part nuts. Panned centers most commonly use chocolate in the range of two times the weight of the centers. It is always easier to obtain a smooth finish using more chocolate rather than less. At the end of engrossing, the centers should be entirely coated but have a slightly irregular texture on their surface.
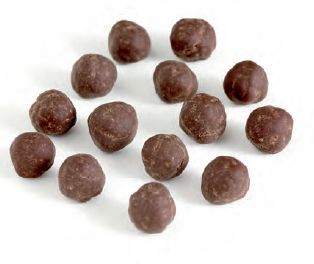
Properly precoated hazelnuts. Properly engrossed hazelnuts ready for smoothing. Smoothed hazelnuts ready for polishing. Well-panned and finished hazelnuts. - Smooth the Engrossed Confections. Once the centers are engrossed, they may be smoothed by adding more charges of warm chocolate without the addition of air, which permits heat to build up in the pan, softening the chocolate on the centers. Some pans have lids that help to hold heat in during the smoothing process. As the softened chocolate cascades in the pan, the tumbling action eliminates the irregularities that have formed on the surfaces during engrossing, resulting in a smooth, regular surface that will provide a uniform, high-gloss finish with no unpolished crevices. The important role smoothing plays in the final appearance of panned confections cannot be overstated. Centers that have not been adequately smoothed will not accept polish and glaze uniformly, will be covered with unpolished valleys, and will never achieve the desired appearance. Properly smoothed centers can be identified by a simple test: take one or two of the centers in the hand, and exhale deeply onto them to fog them. The appearance of the fogged centers approximates how they will look when polished; if irregularities are present, the centers should be smoothed further until all irregularities are eliminated.
- Allow the Confections to Harden. Once the centers are coated and smooth, they should be placed on trays in a cool area overnight to allow the chocolate to further crystallize, so that it is well hardened for polishing. Properly hardened centers will maintain their shape and smoothness during the polishing and glazing process.
Finish by Polishing. Polishing is accomplished at a lower speed of the panning machine (18 to 20 rpm). Add a small quantity of polishing agent, usually a gum-arabic product, and tumble the centers while cool air is blown into the pan. To remove imperfections, apply several coats of polish. Continue this low-speed tumbling action of the rotating pan until the products are buffed to a high shine.
Because the polishing agent is water soluble, the shine developed by polishing will be destroyed by humidity if it is not protected by a glaze. The glaze used in panning is usually shellac based and is applied in a similar manner to the polish, but without the addition of air. Once the shellac is distributed over the centers, shut off the machine, rotating it only briefly (jogging it) every 1 to 3 minutes until the shellac has dried. Then run the pan slowly for a final few minutes to buff out any “kiss marks,” where the candies have touched.
If a shiny finish is not desired, cocoa powder or confectioners’ sugar may be applied in lieu of the polish and glaze. This finish saves labor and produces a more rustic-looking product.