Advertisement
Sterilizing by Pressure Cooker
Appears in

By Audrey Ellis
Published 1971
- Pack vegetables into clean, warm jars, leaving ¼ inch headspace.
- Fill the jars with hot brine, just off the boil. Rotate the jars between the palms of the hands to eliminate air bubbles. Wipe tops of jars with a clean cloth. Adjust rubber rings and lids.
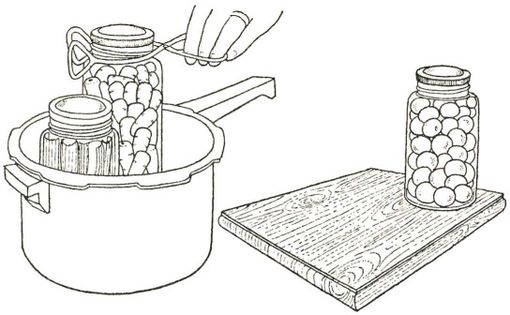
- Adjust clips or screw bands. If using screw bands, screw down, then loosen by a quarter turn before placing in the pressure cooker.
- Process the hot jars immediately. Put 1 pint hot water into the pressure cooker and add 1 tablespoon vinegar to prevent discolouration. Stand the jars on the inverted trivet. Do not allow jars to touch each other or the sides of the cooker. Put sheets of cardboard between the jars if necessary, and add an extra ¼ pint water to allow for absorption. Put on the cover, and place the cooker on a low heat. Leave control valve or vent open till steam flows freely. Then lower the heat and leave to steam for 5 minutes. This ensures that all air is exhausted from the cooker and jars.
- Close the valve or vent and bring to 10 lb. pressure on a low heat. Process according to the timetable given here, making sure the pressure does not drop below 10 lb. at any time.
- Turn off the heat, or draw cooker aside and allow the pressure to reduce gradually at room temperature. Do not reduce pressure with cold water, as the sudden change in temperature may crack the jars.
- Lift out the jars on to a dry wooden board. If screw bands are used, tighten each band at once. But do not attempt to adjust the rubber rings or lids in any way during the cooling.
- The bottles will have lost much of the brine, which will have boiled away. This does not affect the keeping qualities of the vegetables.
- The jars should be treated from this point onwards as for bottled fruit. When required for use, bring the vegetables slowly to the boil in the remains of the brine, or in fresh water.