Advertisement

Hand-Dipped Chocolates

Published 2012
This type of confection is almost completely different in nature from molded chocolates, where the shell is determined by the filling. The filling can be a layer of ganache, caramel, marzipan, pâte de fruit, or marshmallow, or it can be two or three of these items stacked. The filling is poured into a frame just after it is made, and then it is left to set at room temperature (see Step 8 of the ganache).
- Using a paint roller, paint tempered chocolate on the surface of the item to be cut and dipped (ganache, caramel, and so forth). Let it set, and then turn it over and apply a coat of tempered chocolate in the same way.
- Ideally, cut the slab with a guitar cutter to the desired shape; a cutter of this kind is expensive, but cutting by hand will definitely show. You can also use a ring cutter for round shapes; dip the cutter in hot water and pat it dry before cutting the product.
- Set up your mise en place using the following:
- Dipping fork(s).
-
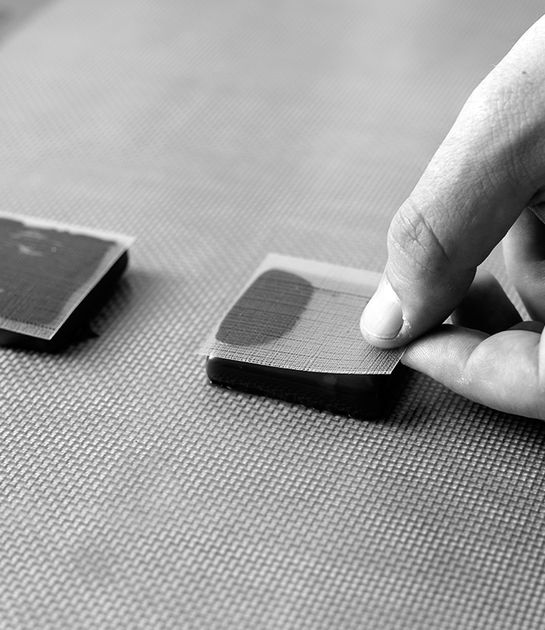
Flat surface lined with an acetate sheet or nonstick rubber mat. Using a textured mat on the surface makes the dipped chocolate a little more special than placing it straight on a rubber mat. If you are using an acetate sheet, with or without texture, moisten the surface you will be placing it on first with a water mister. You can also use nonstick oil spray, but this is harder to clean up and it may make the acetate cling a little too much to the surface it is on. Place the acetate on the surface, and then rub it with a paper towel using your hand to smooth out the surface.
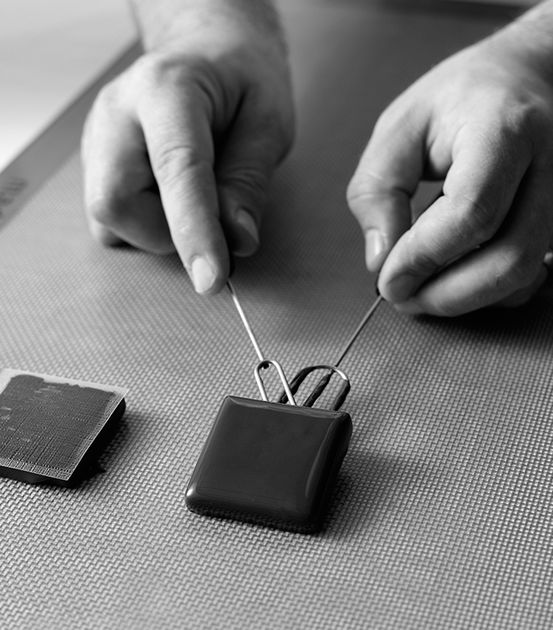
Place the item to be dipped on a dipping fork and submerge it into the tempered chocolate. Scrape the bottom of the tool against the rim of the bowl to remove excess chocolate. Use a second fork to transfer the chocolate to a surface to set, taking care not to create a foot. If you are garnishing the chocolate with a textured transfer sheet, apply it before the chocolate has completely crystallized. - Garnishes for the chocolates, other forks and tools to create a texture on the dipped chocolate’s surface, individual acetate squares with or without texture and with or without a transfer image.
- Source of heat to keep the chocolate tempered (microwave, simmering water bath, or a bowl with hot chocolate).
- Tempered chocolate.
- Place the item to be dipped on a dipping fork and dip it into the tempered chocolate, completely submerging it into the chocolate.
- Scrape the bottom of the dipping tool against the rim of the bowl to remove the excess chocolate. One of the attributes of quality dipped chocolates is that they do not have any feet at their base. It should be a sharp corner. Feet develop when there is still too much chocolate left on the piece and it is not scraped off properly.
- Transfer each piece to the prepared surface to set. Before it sets you will need to apply the desired garnish. If it is an edible component like salt, a pinch of cinnamon, or cocoa nibs, it should be applied before the chocolate sets so that it will adhere to the piece. Otherwise it will fall off. If you are looking for a textured design, this should also be created before the chocolate sets, but not if it is still too wet; otherwise the texture will not stay and the chocolate will puddle back to a flat surface. You can use a dipping fork for this or an offset spatula. If you are applying a square of acetate on the sheet, you should also apply it before the chocolate sets so that it will stick; only remove it once the chocolate sets completely.