Medium
10 to 12
large PiesBy Matt Lewis and Renato Poliafito
Published 2010
Red velvet cake, once a minor curiosity, is now ubiquitous in American bake-shops. It is a trend that outlasted its trendiness. Though most closely identified as a Southern recipe, the red velvet probably originated somewhere in the Northeast as a cocoa powder- and buttermilk-based cake. In theory, the cocoa powder reacts with the baking soda to create a reddish hue, but somewhere along the way, the red quotient began to be upped with an unhealthy dose of red dye. Unfortunately, a rash of basic vanilla cakes containing buckets of red dye suddenly became “red velvet cakes.” True red velvet needs at least three ingredients to qualify for the moniker: cocoa powder, buttermilk, and shortening (it lends a great fluffy texture). I include all of these in our 
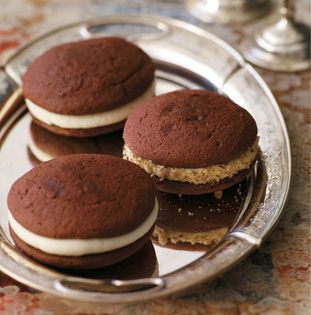
Red Velvet Whoopie Pies, and fill them with a delectable cream cheese frosting. It is a Southern/Northern hybrid that looks great and tastes even better.
In a large bowl, sift together the flour, cocoa powder, baking powder, baking soda, and salt.
In a small bowl, whisk together the canola oil and buttermilk.
In the bowl of an electric mixer fitted with the paddle attachment, cream the butter and shortening until smooth. Scrape down the bowl and add the sugars. Beat until the mixture is light and fluffy, about 5 minutes. Add the egg and vanilla extract and beat until combined. Scrape down the sides and bottom of the bowl, add the red gel food coloring, then mix on low speed for a few more seconds to incorporate. Do not overmix.
Turn the mixer to low. Add the flour mixture, alternating with the buttermilk mixture, in three separate additions, beginning and ending with the flour mixture until just combined. Scrape down the sides and bottom of the bowl, then mix on low speed for a few more seconds.
Cover with plastic wrap and chill the batter in the refrigerator for about 15 minutes.
Remove the batter from the refrigerator. Use a small ice cream scoop with a release mechanism to drop heaping tablespoons of the dough onto the prepared baking sheets about 1 inch apart.
Sift the confectioners’ sugar into a medium bowl and set aside.
In the bowl of an electric mixer fitted with the paddle attachment, beat the butter until is completely smooth. Add the cream creese and beat until combined.
Add the confectioners’ sugar, vanilla, and salt and beat until smooth. Be careful not to overbeat the filling, or it will lose structure. (The filling can be made 1 day ahead. Cover the bowl tightly and put it in the refrigerator. Let the filling soften at room temperature before using).
Spread the walnuts in an even layer on a small plate.
Turn half of the cooled cookies upside down (flat side facing up).
Use an ice cream scoop or a tablespoon to drop a large dollop of filling onto the flat side of the cookie. Place another cookie, flat side down, on top of the filling. Press down slightly so that the filling spreads to the edges of the cookie. Turn the whoopie on its side and roll through the walnuts. Repeat until all the cookies are used. Put the whoopie pies in the refrigerator for about 30 minutes to firm up before serving.
The whoopie pies will keep for up to 3 days on a parchment-lined baking sheet covered with plastic wrap, in the refrigerator.
© 2010 All rights reserved. Published by Abrams Books.